

Step into the enchanting world of Stamperia's Winter Valley with this gorgeous Christmas Canvas.
Begin by preparing both sides of a 'Little Birdie MDF Rectangle, 6" x 8" using a layer of Stamperia Primer, followed by a coat of Stamperia Allegro Paints Titanium White with Light Blue that have been mixed together.
Cut the Blue Ice/Snow page from the Stamperia 12"x 12" Winter Valley Pack to fit to the base and attach using the Stamperia Mix Media Glue, and then seal using two more coats of Mix Media Glue, drying after each coat.
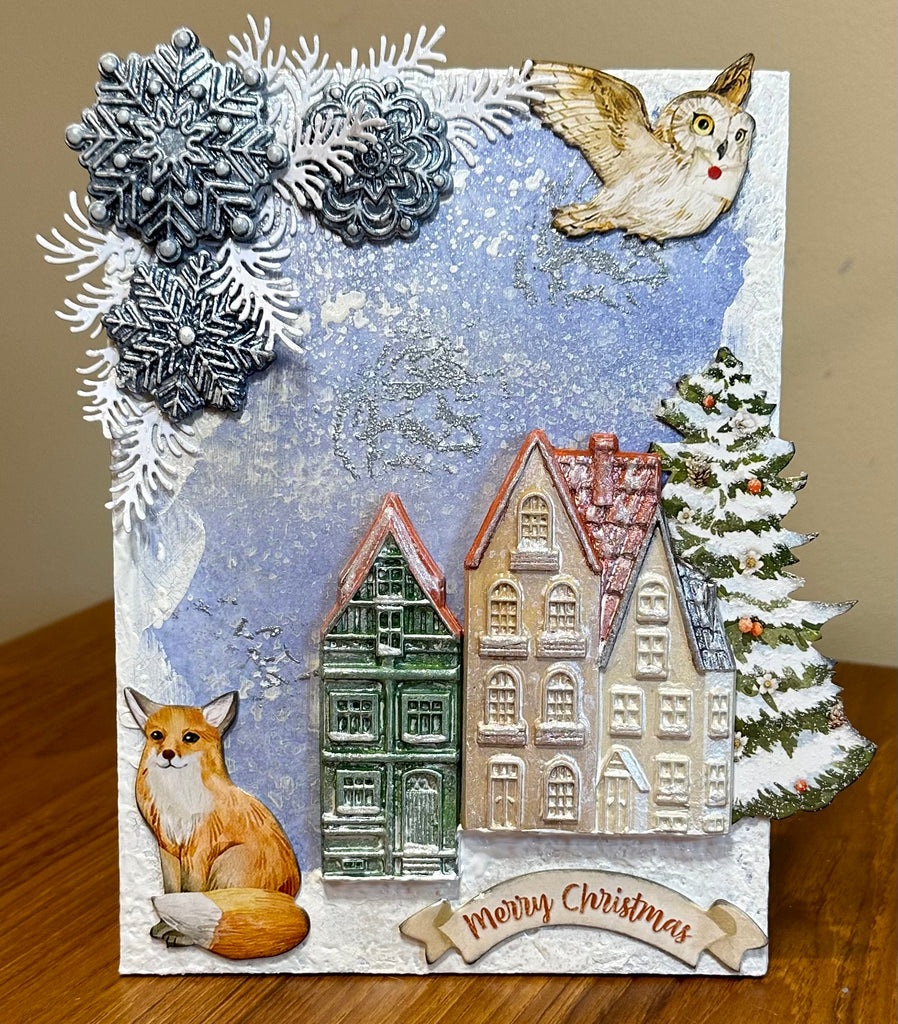
The moulds, shaped like delicate snowflakes and cozy houses, are made using resin (or could be made using Stamperia Soft Clay), using the Stamperia A6 Silicon Snowflakes Mould and the Stamperia A4 Cozy Houses mould and then coated with primer.
The snowflakes are painted using the Stamperia Titanium White Paint, and once dry, adorned with Prima Ash Grey Antiquing Wax using a Prima Dabbing Brush, then wiped with a baby wipe to reveal the intricate detail of the snowflake. The cozy houses are painted with Stamperia Allegro Paints Nougat, Cookie, Brick Red, Earth, Old Ivory and Leaf Green, then highlighted with Prima Old White Wax.
Once painted, the moulds were given a glistening finish with Stamperia Pearl White Aqua Colour Spray, followed by a dab with a paper towel while drying with a heat tool, leaving a nice snowy sheen. The window ledges and roofs of the houses were lastly given a glittery snow effect using Stamperia Iridescent Contour Liner.
Stamperia White Crackle Paste is applied to the edges of the canvas, then dried with a heat tool to reveal gorgeous magical cracks, followed by a silver sparkle being added to the canvas using Stamperia Vintage Library Labels Stamp Set, Stamperia Embossing Pad and Stamperia Silver Embossing Powder. Julie chose the cracks stamp and randomly stamped several patches onto the canvas before embossing to reveal the sparkling silver.
Add shiny snow to the sides of the canvas as well as building up the bottom right corner, using Stamperia Heavy Body Paste, dabbing it with your fingers to give a stunning snowy effect. Another spray of Stamperia Pearl White Aqua Colour Spray over the whole canvas will give it a great shimmery finish. Using your fingers, apply Stamperia Arctic Snow on top of the snow in the bottom right corner, this will leave you with shiny, glittery snow!
Now its time to add all of the elements to your canvas and really bring it to life! Using Stamperia Glossy Gel, attach the Stamperia Winter Valley Die Cuts edged with Ranger Jet Black Archival Ink to add a sweetness to the scene, as well as icy pine branches scattered amongst the snowflake moulds in the top left corner. These branches were made using the 5 Crazy Ladies Pine Flourish Die Set and white cardstock, decorated with a touch of Stamperia Iridescent Contour Liner. Last but not least, Julie used more Heavy Body Paste on the bottom of the house moulds to blend them into the show, and voila! There you have your gorgeous Winter Valley Christmas Canvas!
Thank you for visiting our Blog, we hope you enjoy creating this stunning canvas!
Comments