Paper Flourish Blog

SHRINKY EARRINGS - by Sharon

SHRINKY EARRINGS - by Sharon

These gorgeous earrings are simple to make, and you can use any stamp you like, although ensuring the image is a decent size so that your shrunk earrings are still big enough to see.
Start by making sure the rough side of the Shrink Plastic is facing upwards. Then stamp the chosen image twice using Archival ink. 
Next colour the image with preferred medium. Posca paint pens were used on the samples. (Once the paint is dry you can use the top of a Posca pen to draw a circle above the image where you would like the hole to be punched).
Roughly cut both images out from the sheet. This is done so the images are more manageable to fussy cut and leaves less chance of the plastic cracking.  Once you finish fussy cutting around the image including the circle at the top, punch a hole in the circle, leaving approx. 2mm around the top & sides of the circle.
Next is the fun and magical part - the shrinking! Have a big acrylic block or heavy object ready. Heat the images with a heat tool one at a time. They will curl up into a ball but keep the heat on them as they will uncurl fairly quickly. As soon as they flatten out place the acrylic block on top to help flatten the edges.
Once cooled, attach the earring findings (the shiny side is the right side).
Its all trial and error as no 2 will turn out exactly the same.
Hints & tips. 
  • Use a ¼” punch for the hole.
  • Have a skewer or tweezers ready to open the hole just in case it does not shrink into a round shape. Do this before placing the heavy object on them.
Have fun experimenting and making all kinds of earrings, it is a great way to make a personalised gift! 
WINTER VALLEY CHRISTMAS CANVAS - created by Murphy's Mum

WINTER VALLEY CHRISTMAS CANVAS - created by Murphy's Mum

Step into the enchanting world of Stamperia's Winter Valley with this gorgeous Christmas Canvas.
Begin by preparing both sides of a 'Little Birdie MDF Rectangle, 6" x 8" using a layer of  Stamperia Primer, followed by a coat of  Stamperia Allegro Paints Titanium White with Light Blue that have been mixed together.
Cut the Blue Ice/Snow page from the Stamperia 12"x 12" Winter Valley Pack to fit to the base and attach using the Stamperia Mix Media Glue, and then seal using two more coats of Mix Media Glue, drying after each coat.
The moulds, shaped like delicate snowflakes and cozy houses, are made using resin (or could be made using Stamperia Soft Clay), using the Stamperia A6 Silicon Snowflakes Mould and the Stamperia A4 Cozy Houses mould and then coated with primer. 
The snowflakes are painted using the Stamperia Titanium White Paint, and once dry, adorned with Prima Ash Grey Antiquing Wax using a Prima Dabbing Brush, then wiped with a baby wipe to reveal the intricate detail of the snowflake. The cozy houses are painted with Stamperia Allegro Paints Nougat, Cookie, Brick Red, Earth, Old Ivory and Leaf Green, then highlighted with Prima Old White Wax.
Once painted, the moulds were given a glistening finish with Stamperia Pearl White Aqua Colour Spray, followed by a dab with a paper towel while drying with a heat tool, leaving a nice snowy sheen. The window ledges and roofs of the houses were lastly given a glittery snow effect using Stamperia Iridescent Contour Liner.
Stamperia White Crackle Paste is applied to the edges of the canvas, then dried with a heat tool to reveal gorgeous magical cracks, followed by a silver sparkle being added to the canvas using Stamperia Vintage Library Labels Stamp Set, Stamperia Embossing Pad and Stamperia Silver Embossing Powder. Julie chose the cracks stamp and randomly stamped several patches onto the canvas before embossing to reveal the sparkling silver.
Add shiny snow to the sides of the canvas as well as building up the bottom right corner, using Stamperia Heavy Body Paste, dabbing it with your fingers to give a stunning snowy effect. Another spray of Stamperia Pearl White Aqua Colour Spray over the whole canvas will give it a great shimmery finish. Using your fingers, apply Stamperia Arctic Snow on top of the snow in the bottom right corner, this will leave you with shiny, glittery snow!
Now its time to add all of the elements to your canvas and really bring it to life! Using Stamperia Glossy Gel, attach the Stamperia Winter Valley Die Cuts edged with Ranger Jet Black Archival Ink to add a sweetness to the scene, as well as icy pine branches scattered amongst the snowflake moulds in the top left corner. These branches were made using the 5 Crazy Ladies Pine Flourish Die Set and white cardstock, decorated with a touch of Stamperia Iridescent Contour Liner. Last but not least, Julie used more Heavy Body Paste on the bottom of the house moulds to blend them into the show, and voila! There you have your gorgeous Winter Valley Christmas Canvas!
Thank you for visiting our Blog, we hope you enjoy creating this stunning canvas!


ANTIQUE SHOP CANVAS - created by Murphy's Mum

ANTIQUE SHOP CANVAS - created by Murphy's Mum

This canvas unfolds like a forgotten treasure, carefully assembled with a touch of nostalgia using the beautiful Mintay Antique Shop Collection 12” Paper Pack and the matching Antique Shop Die Cuts. The moulds (which are a perfect match with this collection) were created using the Stamperia Lady Vagabond Lifestyle Cats Mould using resin (these could also be made with Stamperia Soft Clay). Julie chose to use the adorable cat, the stack of books, and the gramophone mould pieces.
The canvas itself, a Mont Marte 8” x 10” Canvas Panel is the perfect base for this vintage symphony. The canvas and the moulds were coated in Stamperia Primer, followed by a coat of Stamperia Old Ivory Allegro Paint.
Paper 03 was chosen from the Antique Shop collection to adorn the canvas with its music-inspired motif. The piece, cut from the left side of this gorgeous paper, is cut to the same size as the canvas, attached and sealed with 2 coats of Stamperia Mix Media Glue. The remaining piece of this paper was cut to measure 9” long, and its edges distressed by the Tim Holtz Paper Distresser. Stamperia Mix Media Glue added a lovely sheen to this paper strip, 1 coat to the back and 2 coats to the front.
Stamperia Ancient Pink Allegro Paint, lightly scraped onto sections of the canvas, added a subtle blush to the canvas.  Stamperia White Crackle Paste, mixed with the same pink paint, was lightly applied to the edges of the canvas, and sections of the front of the panel, using the Stamperia Metal Spatula.
Stamperia Clear Crackle Paste was then added to the canvas and the paper strip. Stamperia Heavy Body Paste, mixed with Dina Wakley Sage Paint, adorned the right side of the canvas in a delicate pattern created using the Stamperia Vintage Library Texture Stencil.
The moulds were painted with a palette of hues, Ancient Pink, Old Ivory & Burgundy, as well as the Dina Wakley Sage Paint. A touch of glamour was added to the gramophone mould using Stamperia Gold Porporina. This was done using a brush with Mix Media Glue, and picking up the Porporina to paint gorgeous highlights. WOW!
Stamperia Leather Aqua Colour Spray, was then used on the moulds and dabbed with paper towel, followed by Prima Vintage Gold Wax and Stamperia Vintage Patina White to give them a complete antique finish.
Stamperia Vintage Antiquing Paste, applied with a Lavinia Series 7 Stencil Brush moistened with baby oil was then applied to the panel and paper strip. The soft wipe of a baby wipe revealed the enchanting cracks left behind by the crackle paste.
The canvas then comes together, using Stamperia Glossy Gel, stick the moulds, paper strip, die cuts, cards from the paper pack, and flowers to the canvas, then lightly apply Prima Vintage Gold Wax gently  along the canvas edges, to add a touch of golden-age glamour.
Enjoy a trip down memory lane as you create your Antique Shop Canvas!
GLOSSY CHRISTMAS WREATH - by Creating Netty

GLOSSY CHRISTMAS WREATH - by Creating Netty

Lynette has skillfully crafted a stunning glossy and  intricately adorned chipboard wreath. The technique she employed is versatile and can be applied to embellish any chipboard items to give your projects that extra touch.

Working with a Mintay Chipboard (D58) measuring 12” x 12”, Lynette selected a charming Merry Christmas Wreath design. She sealed the chipboard using Stamperia Black and Matt Superbase, creating a great base.

The transformative stage involved enhancing the chipboard with Stamperia Stardust Metallic Pigments. Golden Sun, Astral Green, and Nebula Rose were applied using Stamperia Beeswax-moistened fingers. This method adds a gorgeous shimmery finish.

To achieve a glossy shine, Lynette coated the chipboard with Ranger Glossy Accents, and allowed to dry overnight. The result is a gorgeous shiny chipboard piece, that will give your Christmas cards and various projects that extra touch.

Simply Stunning, and very easy to do! Enjoy! 

AROUND THE WORLD COVERED 2024 DIARY – created by Murphy’s Mum

AROUND THE WORLD COVERED 2024 DIARY – created by Murphy’s Mum

If you are looking for a unique grungy Father's Day gift, this project is easy and is sure to make Dad's Day! It's none other than a 2024 Diary that's been transformed into an grungy masterpiece by using the mind-blowing Stamperia Around The World Collection!

Julie started things off by protecting the inside of the diary with removable tape, and then covered the inside pages with some foil. But that's just the beginning! The front, back cover, and the spine underwent a magical makeover. she prepped them with Stamperia Primer and then splashed on Stamperia Allegro Paint Old Ivory.

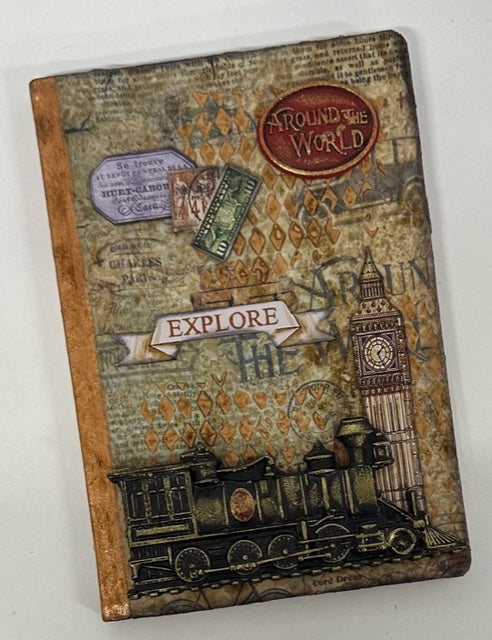
Hold onto your seats because the real excitement begins when Julie laid her hands on the enchanting fabrics from the Around The World Fabric Pack. She sliced one of those beauties in half and affixed one piece to the front cover and the other to the back cover using the fantastic Stamperia Mix Media Glue. And guess what? The spine got a bit of a rebellious twist – it remained gloriously bare! Once the fabric was securely in place, she gave it a snazzy trim in line with the cover and then sealed the deal with 3 coats of Mix Media Glue, giving each coat time to dry and set the stage for the next.

Armed with Stamperia Volume Paste,  some Stamperia Cookie Paint to colour it, and the remarkable Stamperia Stencil Around The World Double Texture, Julie went wild with stenciling. The front and back cover got showered with stenciled goodness, taking the diary's grungy quotient up several notches.

Now, let's talk about the spine – that's where things really got electrifying. Julie wielded Stamperia Copper Porporina and Mix Media Glue, concocting a concoction that's all about wetting your brush with Mix Media Glue, picking up some Porporina on your brush, and applying the Porporina-infused brush to the spine. Magic in the making, I tell you!

Get ready for a splash of color that's straight out of your wildest dreams! Julie unleashed the grungy Stamperia Aqua Colour Spray Leather all over the cover, and then dried it using her trusty heat tool. A paper towel was the secret weapon that helped achieve the perfect level of color, adjusting it to the perfect level of grunge.

But wait, there's more! To add that extra oomph, Julie inked the edges of the cover with the fierce and fabulous Ranger Jet Black Archival Ink, making every detail pop with attitude.

Now, for the pièce de résistance – the front cover got decked out with moulds created using the Stamperia Mould Around The World Train and the Around The World Die Cuts. And guess what? These moulds are a creative playground where Stamperia Soft Clay or Resin get to party! The moulds got a seal of approval with the dynamic Stamperia Black & Matt Superbase. The train took on a bold new avatar with Stamperia Black Paint, while the Around The World Oval sign danced with Stamperia Cardinal Red Paint.

The moulds then went for a delightful splash in the Stamperia Aqua Colour Leather Spray pool, followed by a dab session with a trusty paper towel and a quick-drying routine. But the glitz doesn't stop there – enter Stamperia Beeswax and Stardust Golden Sun Metallic Pigment, adding that final sprinkle of enchantment.

For that final touch of grunge,  the edges of the die cuts got their own jet-black makeover with the iconic Jet Black Archival Ink from Ranger.

Enjoy creating your awesome grungy diary for Dad or as a special gift for someone (or yourself!) Thank you for visiting our Blog, happy crafting!